Learn about New Computer n Mobile tricks every day

Hack Wifi Using Dumper

♠ Posted by Damon


  1. Download and install JumpStart, WinPcap, and Dumpper .
  2. Open Dumpper. It'll be in Spanish, so go to the far right tab and select 'English' in between the other two options.
    Your programs are set up and ready to go, now begin the process:
  3. In the 'Networks' tab, select the network adapter you wish to use. Hit the 'Scan' button now.
  4. After it completes the scan, go over to the 'Wps' tab. In the area that says 'Connect using JumpStart', hit 'Browse' to select the location of where you installed JumpStart in the previous set-up steps. (By default, it installs in C:\Program Files (x86)\Jumpstart. Don't open it, just select the 'Jumpstart' folder and click 'OK')
  5. In the area 'Show default pin', select 'All networks' isntead of 'Only known networks'.
  6. Hit the 'Scan' button.
  7. Select the network you wish to penetrate. Remember the 'Pin' corresponding to your network in the scan results, this will be needed for later.
  8. In the previous area 'Connect using Jumpstart', hit the 'Start JumpStart' button.
  9. Under 'What do you want to do?', select 'Join a wireless network' and hit 'Next'
  10. Under 'Which setup method do you want to use?', select "Enter the PIN from my access point" and enter the PIN next to your network in the scan section back in the previous scan results.
  11. Finally, select the targeted network from before and hit 'Next'.
    Now you're happily connected to that WiFi network you just penetrated. Do you want to see the password so you can get on from other devices without doing this process? Sure! Follow these simple steps:
  12. Open the menu where you join WiFi networks/view the network you're connected to.
  13. Right click on the network you just joined and hit 'Properties'
  14. Under the 'Security' tab, you can see the password, but it's just dots. Check the 'Show characters' box under it.
  15. The password will then reveal itself.             


If u want any software feel free to mail me i will get in touch  with You as soon as possible..
Set Windows to automatically shutdown whenever you want:

♠ Posted by Damon

You can always set windows to automatically shutdown whenever you want. Like my self, I have always away when downloading movies or series. Here's how to do it..

1.Click Start Button
2.Click Run
3. type at 20:00 shutdown -s
4.Hit OK
5.DONE!

here's some explanation. look no 3, here i set windows to shutdown at 8 PM (2000).
if you would like to auto shutdown at 3 AM just change the value to 03:00. So,there will be like this

at 03:00 shutdown -s

p/s: If you want to restart just change -s to -r 

Use Your Pen-drive As RAM:

♠ Posted by Damon
Just Follow These Steps:-

1)Connect your PEN-DRIVE to your PC(Pen-drive should be atleast 1 GB or if u have of 4 GB than its better)2)Allow PC what it is supposed to do..let system to detect pen-drive.3)After PC finishes its detection,U have to do little work.4)Right Click on My Computer & select properties.5)Go to advance,then performance setting and than advance them.6)Select PEN-DRIVE & click on CUSTOMIZE SIZE(Check the value of space available).7)Enter the same in the INITIAL & the MAX column.''YOU JUST USED THE MEMORY OF THE PEN-DRIVE AS A VIRTUAL MEMORY''.8)Now Restart Ur PC & enjoy your fast & super system.

Block all your USB Ports in windows 7/8/10

♠ Posted by Damon


Step 1 : Open run by pressing Windows + R.

Step 2 : Type "regedit". This is Registry editor tool.

After pressing Enter, you will be prompted to press yes or no. Click Yes on user account control dialogue box.

Step 3 : The Registry editor looks like this


Go to this Path on the left pane

HKEY_LOCAL_MACHINE\SYSTEM\CurrentControlSet\Services\USBSTOR

Navigate through the above path by clicking on the right arrow symbol a dropdown list is appeared.


Step 4 : Click on the USBSTOR folder in the left pane as shown here..


You will find some values on the right pane. Go to Start value in the list, here it is second from the bottom.Double click on that.

A dialogue box appears like this.


Step 5:  Change the value to 4. This will disable the USB Storage.


If You want to re-enable it, Come here and change the value to 3.

Download torrentz file in IDM(internet download manager)

♠ Posted by Damon

Want to download torrentz file and if the internet speed is very less like less than 150kbps(download speed)...then all you need to do is copy the magnetic link url(torrentz magnet URL) for that file from any of the torrentz site and paste it in the search bar of www.zbigz.com and when you press 'go' after pasting the magnetic URL, that file gets cached in the zbigz site and will be available for download using IDM(internet download manager) and other downloaders ....

Trick to protect your pen drive or any other external drive with a password

♠ Posted by Damon

  • Connect your pen drive or any other external drive which is needed to be locked. Wait for the computer to detect it.
  • Now open Start Menu and search for BitLocker Drive Encryption. Open it. It looks like this.


  • You can now see all the drives (both internal and external ones).
  • Just beside your external drive, there will be an option Turn On BitLocker.Click it. A dialogue box like this will appear.

  • Check the option Use a password to unlock the drive. Type the password of your choice and then click Next.
  • Save the recovery key, somewhere safe, in case you forget the password. Move on by clicking Next
  • This would take some time depending on the size of your external drive.

Trick to reveal the hidden password from the password field.

♠ Posted by Damon


Note:
As it is quite time consuming, here is screenshots from Google Chrome only. In all other browsers, it is almost the same except step number 3. This trick is applicable in all websites although I have shown here the Gmail page only.

Step 1. 
Go to the login page


Step 2. 
Enter username so that password will be auto-filled


Step 3. 
Press 'ctrl+shift+i' if you are using chrome or 'Q' if you are using Firefox or 'F12' if you are using IE & you will see a bar at bottom of your screen showing the HTML code behind your page.


Step 4. 
Select password field to see its source code in the source code field shown in the bottom of browser


Step 5. 
Change type="password" to type="text" & done. You can now see the password as a text.


As I am a search engine optimizer, I have to enter many usernames and complex passwords throughout the day. Although I remember usernames efficiently, passwords are too intricate to remember. 

Usually I have to open an excel sheet full of usernames and passwords for that but being a little lazy one, I prefer the shortcuts often. This one I learned a few months back. And I use it whenever I need to read the password behind asterisks to copy it & paste somewhere else. The logic is very simple. 


Note:
This trick works only for the saved passwords. So if you want to use it to steal somebody's password (which I don't advise at all), you should have "remember password" checked in advance while entering login details. Otherwise the password won't be auto-filled by browser when you want to know it.

Some Youtube tricks

♠ Posted by Damon

- k = pause or play

- j = rewind 10 seconds
- l = fast-forward 10 seconds
- m = mute
- Number 0 = go to the beginning of the video
- Numbers 1 to 9 = jump to 10% to 90% of the video
While captions are on:
- + = make caption font bigger
- - = make caption font smaller

Use “Cmnd + Shift + T” on a Mac. Works in Chrome and Firefox.


Pressing “shift” produces .net and “shift/ctrl” is .org. Try it yourself! 


Mac users, hold down “Apple Key/Command”.

How to Sign Into Two or More Skype Accounts at Once

♠ Posted by Damon
To launch a second Skype application on Windows, press Windows Key + R to open the Run dialog, copy-paste the below command into it, and press Enter.
On a 64-bit version of Windows — you’re probably using a 64-bit version of Windows — run the following command:
"C:\Program Files (x86)\Skype\Phone\Skype.exe" /secondary
On a 32-bit version of Windows, run the following command:
"C:\Program Files\Skype\Phone\Skype.exe" /secondary
You can repeat this process to open a third, fourth, and other additional copies of Skype. Sign into each Skype window with a new account.
(If you installed Skype to a different folder on your computer instead of the default one, you’ll have to change the above commands to point at the Skype.exe file on your computer.)
You can create a shortcut to make this easier. Open a File Explorer or Windows Explorer window and navigate to “C:\Program Files (x86)\Skype\Phone\” on a 64-bit version of Windows or “C:\Program Files\Skype\Phone\” on a 32-bit version. Right-click the Skype.exe file and select Send to > Desktop (create shortcut).
Go to your desktop, right-click the Skype shortcut you created, and select Properties. In the Target box, add /secondary to the end. For example, on a 64-bit version of Windows, it should look like:
"C:\Program Files (x86)\Skype\Phone\Skype.exe" /secondary
Give the shortcut a name like “Skype (Second Account)”. You can keep double-clicking this shortcut to open additional instances of Skype.

Finding the Windows Product Key

♠ Posted by Damon
You can easily create a simple VBscript that will read the value out of the registry and then translate it into the format that you need for reinstalling.
Copy and paste the following into a Notepad window:
Set WshShell = CreateObject("WScript.Shell")
MsgBox ConvertToKey(WshShell.RegRead("HKLM\SOFTWARE\Microsoft\Windows NT\CurrentVersion\DigitalProductId"))
Function ConvertToKey(Key)
Const KeyOffset = 52
i = 28
Chars = "BCDFGHJKMPQRTVWXY2346789"
Do
Cur = 0
x = 14
Do
Cur = Cur * 256
Cur = Key(x + KeyOffset) + Cur
Key(x + KeyOffset) = (Cur \ 24) And 255
Cur = Cur Mod 24
x = x -1
Loop While x >= 0
i = i -1
KeyOutput = Mid(Chars, Cur + 1, 1) & KeyOutput
If (((29 - i) Mod 6) = 0) And (i <> -1) Then
i = i -1
KeyOutput = "-" & KeyOutput
End If
Loop While i >= 0
ConvertToKey = KeyOutput
End Function
You’ll need to use File -> Save As, change the “Save as type” to “All Files” and then name it productkey.vbs or something similar ending with the vbs extension. We’d recommend saving to the desktop for easy access.
Once you’ve saved it, you can just double-click and the popup window will show you your product key.
Note :- If you use CTRL + C when the popup window is active, it will copy the contents of the window to the clipboard, and then you can paste it into Notepad or somewhere else.

Locate Your Android Phone Easily.

♠ Posted by Damon


It is very common situation when you can't find your phone. Then you start looking for it , searching in places like under the pillow , in some jeans pocket, bag etc, or may be that you left it in some place which definitely  you don't recall. Then you find some one who could make a call , but you realize that its on silent mod.

There are some apps available but what if you are just like me and a lot of us who don't have it installed. Here comes a Giant to save you all and search your android Phone in minutes. You don't need to find some other phone to ring your to find or to find the location of the phone if it is lost/stolen. The Giant named Google has it all figured out.


on Google just search  "find my phone" 
Google will now locate your phone.

  • You can now Ring you phone for 5 min in full volume even if it was in silent mod. It actually schedules a ring if the phone cannot be reached instantly.
  • You can in worst case erase your phone, helpful when phone gets stolen and sensitive data is there.
  • You can now be little more careless.

How to Enable USB Debugging Mode on Android

♠ Posted by Damon

The ways to enable USB Debugging mode, which is accounted for the key step in Android rooting process, vary from one Android version to another. USB Debugging is required by adb, which is used for rooting, backing up, installing a custom ROM, tacking screenshots from computer and more.


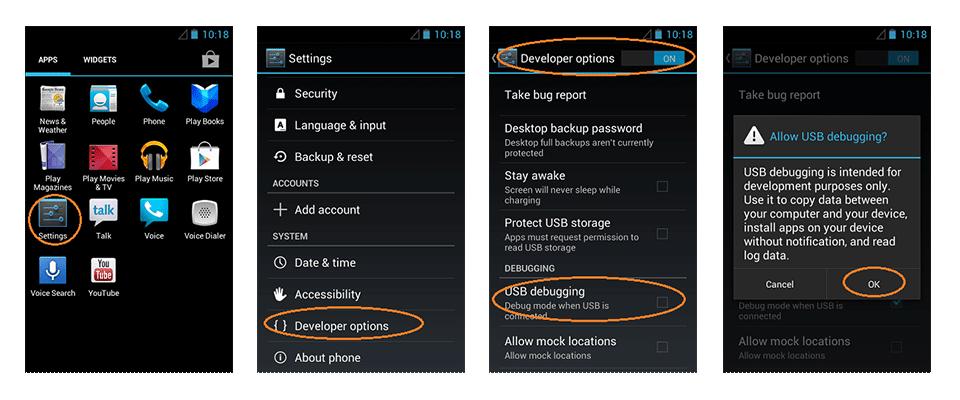
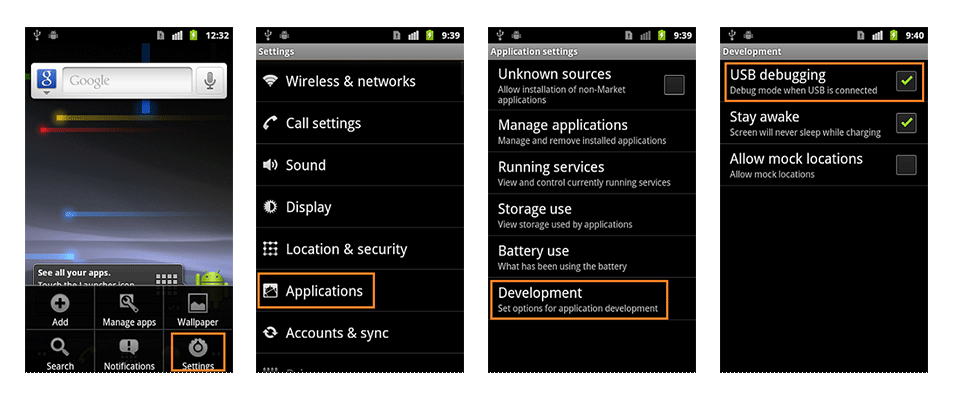
1. Android 2.0-2.3.x
Settings > Applications > Development > USB Debugging.
How to enable usb debugging mode on android 2.0?
2. Android 3.0- 4.1.x
Settings > Developer Options > USB Debugging.
How to enable usb debugging mode on android 3.0?
3. Android 4.2.x and higher.
In Android 4.2 and higher versions, the Developer Options menu and USB Debugging option have been hidden. In former 4.X versions of Android, USB Debugging option is under Developer Options menu.

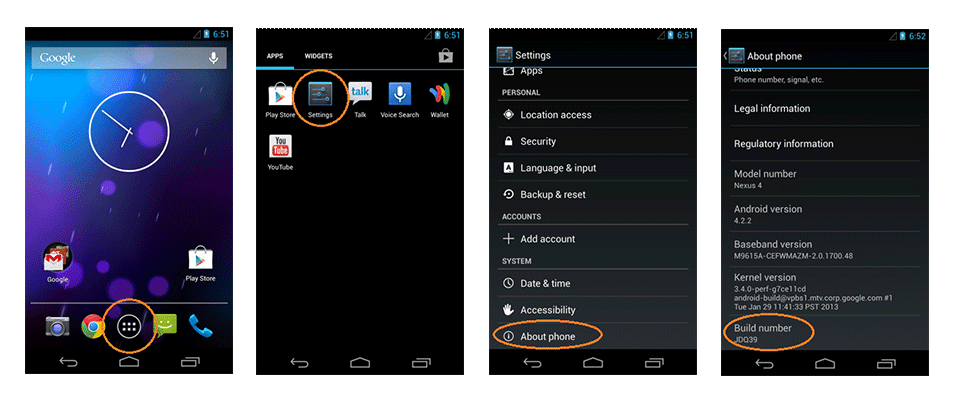
    First, you need to enable "Developer Options Menu".

  1. Click Menu button to enter into App drawer.
  2. Go to "Settings".
  3. Scroll down to the bottom and tap "About phone" or "About tablet",
  4. Scroll down to the bottom of the "About phone" and locate the "Build Number" field.
  5. How to enable usb debugging mode on android 4.2.x and higher?
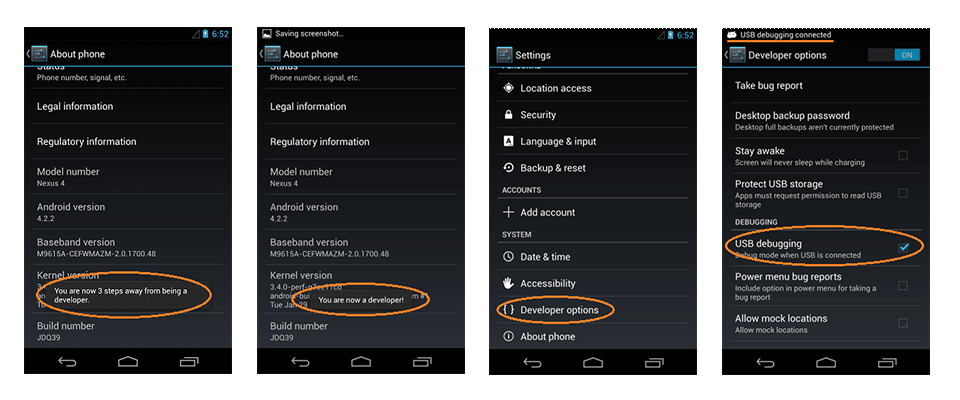
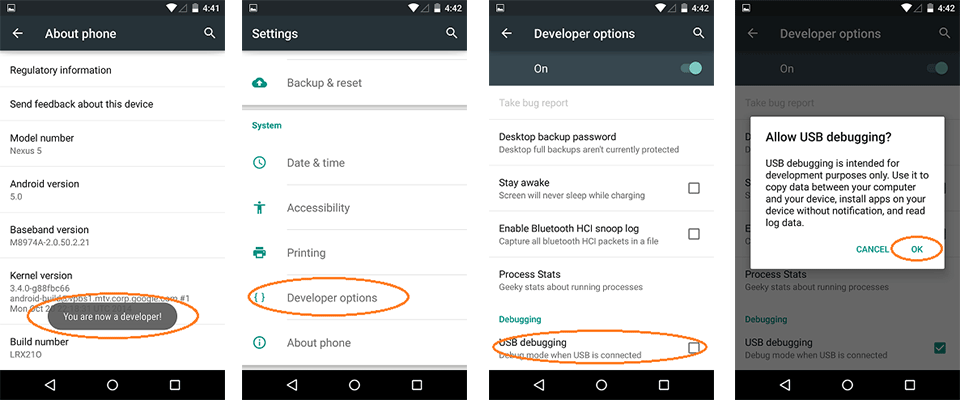
  6. Tap the Build number field seven times to enable Developer Options. Tap a few times and you'll see a countdown that reads "You are now 3 steps away from being a developer."
  7. When you are done, you'll see the message "You are now a developer!".
  8. Tap the Back button and you'll see the Developer options menu under System on your Settings screen.
  9. Now, you can enable USB Debugging mode.

  10. Go to Settings>Developer Options>USB Debugging. Tap the USB Debugging checkbox.
  11. How to enable usb debugging mode on android 4.2.x and higher?
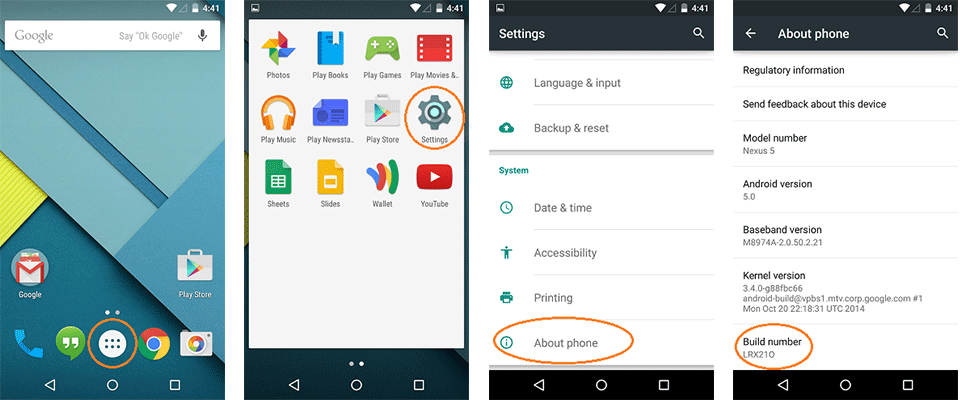
4. Android 5.0 Lollipop
To enable USB Debugging on Android 5.0 Lollipop is the same as Android 4.2.x.
  1. Settings > About Phone > Build number > Tap it 7 times to become developer;
  2. How to enable usb debugging mode on android 4.2.x and higher?
  3. Settings > Developer Options > USB Debugging.
  4. How to enable usb debugging mode on android 4.2.x and higher?
Note: USB Debugging should only be enabled when you need it. Leaving it enabled all the time is kind of a security risk for that this mode grants you high-level access to your device. Say if you connect your Android phone to a USB charging port in a public location, the port could use the USB access to your phone to access data on your phone or install malware. This could happen when and only when USB debugging mode is enabled.
To disable USB Debugging and other developer options when you don't need them, slide the switch at the top of the screen to OFF.

How to Root ur Android Device without PC

♠ Posted by Damon
Here's how to get started.
Image result for how to root my android phone
  1. Step 1: Download and install Kingo Android Root or root master or any.
  2. Step 2: Enable USB debugging mode on your phone. ...click here to know how to enable USB debugging.
  3. Step 3: Run Android Root on your PC, then connect your phone via its USB sync cable. ...
  4. Step 4: Click Root, then sit back and wait while the utility does its thing.

How to access shut down menu using a keyboard shortcut

♠ Posted by Damon
Once you get used to them, keyboard shortcut combinations can make your computing life easier and more efficient. If you need to log off of a Windows account, change users, or shut down or restart Windows:
  1. Press the Windows key + D to go to the desktop, and then press Alt + F4 to bring up the Shut down menu.
  2. Use the arrow keys to select the appropriate action, press Tab until OK is highlighted, and then press Enter

Example:

♠ Posted by Damon

del autorun.inf

if any file is not deleting rename that file by rename command

Example:  rename dst.exe ms.bak this will rename dst.exe to ms.bak